
 Chrissy and Wilson Ratliff, country dwellers who both grew up “outside of town”, live in rural Virginia near the James River with their dogs, bees and chickens (and the occasional snake in the yard). But that’s where the country cliché ends. The 30-ish couple are professionals and creatives with a modern aesthetic, a taste for a monochromatic palette and a fearless command of a circular saw.
When they’re not at work (Chrissy, a paralegal and Wilson, an energy efficiency expert) are quietly and persistently renovating their brick Cape Cod outside Charlottesville, Va., room by room, transforming blood red and sunshine yellow walls into a modernist retreat.
What happens when two skilled DIYers get bored on a Sunday? A total DIY kitchen overall.
The actual project kicked off when Chrissy decided to rip out the threshold to their kitchen floor one afternoon and revealed (under two sticky layers of linoleum) beautiful wide plank country pine floors. That little act of curiosity set the couple down the path of gutting their awkward, outdated and ugly kitchen to make way for a sleek and efficient matte black beauty of a cooking space.
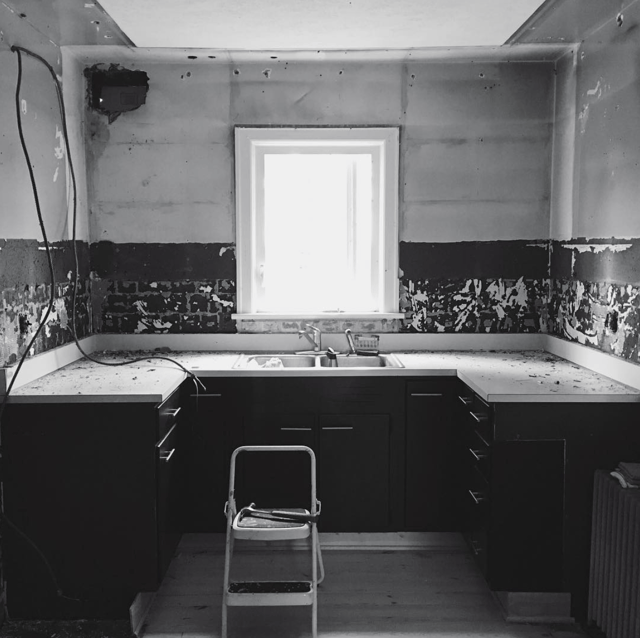
The before...
The after...

But even with the skills to accomplish the job, basic carpentry, electrical, plumbing and tiling, there was still the issue of the countertop.
“Soapstone was a dream of ours from way before we ever thought about re-doing the kitchen."
It was more of a “when we win the lottery and build our own house from scratch, this is what we want” kind of thing. We loved the look and we loved that you could put hot pans on it and you didn't have to worry about staining or anything like that.
“When we decided to do the renovation, we didn’t think we could afford to have soapstone,” Chrissy said.
But then the couple discovered they could fabricate their own soapstone counters with a DIY kit from Alberene, and as Chrissy said, “It was like Christmas morning.”
Chrissy and Wilson headed to the Alberene quarry near their home to purchase a kit, which is actually small left over slabs sold in a crate directly to homeowners for significant savings. The Kitchen in a Box kits contain 1 1/4” thick soapstone blanks that cover 24 linear feet of countertop with six countertop pieces, each 25 1/2″ x 48″ weighing 175 lb and backsplash pieces, each 4″ x 48″. (The kits are also available online to ship direct to homes.)
The process of creating their dream kitchen wasn’t TV magic resolved in a 60 minute HGTV show. The stone was heavy, the sanding messy and the job long. But the result was a luxurious kitchen at a fraction of the cost, with a deep pride in a job done themselves.
Get more design inspiration and practical tips about soapstone kitchens here.
Read on for more details on the kit and Chrissy and Wilson’s renovation adventure.
Stone: Alberene Soapstone
Source: Polycor Virginia Quarry
Combined square footage of stone pieces: 65.5 sq. ft.
Finish: honed/waxed
Stone cost: $1,922
Designer: Homeowner, Chrissy Ratliff
Fabricator: Total DIY by Chrissy and Wilson Ratliff
Build time: Six months worth of weekends

1. Blanco Linus Single Handle Faucet in anthracite 2. Kraus 31” Undermount Single Bowl in black onyx granite 3. Whitewashed pine floors (existing) 4. Vintage holophane light fixture (thrifted) 5. Alberene Soapstone countertops 6. Ikea Orrnäs cabinet hardware 7. Plywood floating shelves (custom built with lumber from Lowe’s) 8. 4”x4” white square tile with black grout 9. KitchenAid appliances in black: Counter depth refrigerator, induction range, dishwasher. 10. 30” Provence Series wall-mount range hood in black
Download the moodboard as a pdf with links here.
Tell me about you and your life out there in the country.
My husband and I, our 2 dogs, our bee hives, and our flock of chickens live in Scottsville, VA. It’s a small town on the James River about half an hour south of Charlottesville, VA. We bought our home on three acres for about 1/3 of the price of a comparably sized house on a postage stamp in the city.
Tell me about your creative endeavors. How do they relate to your DIY work?
The constant drive to create and make spaces beautiful, combined with a very modest budget makes DIY not just the natural choice, but the only choice. There is no way we could afford to hire contractors to do what we want done. If we paid for labor, we wouldn’t be able to afford the materials we want to use and our finished product wouldn’t be up to our standards. If you have champagne taste on a beer budget, you learn to make your own champagne.
Describe the house, and what it was like before you started.
Our home is a 1,400 square foot. 2-story brick Cape Cod with a partially finished basement built in 1949. It sits in a cove of mature maple and oak trees surrounded by farmland in Albemarle County. It has 3 bedrooms, 1.5 baths, a dining room, a glass porch off the kitchen, and a screen porch off the living room. We got a great deal, and it’s a solid house, but every room needed attention.
Aesthetically, every room in the house was pretty ugly with awful outdated fixtures, brown plastic outlet covers and awful wall colors. The kitchen and bathrooms had ugly yellow/brown linoleum, but the rest of the house had beautiful red oak hardwood floors. Everything about it was so charming and solid. You don’t get the same feeling with new construction.
It looks like you expanded your kitchen’s workspace without bumping out.
The original kitchen didn’t have much workspace at all. I think when it was remodeled in the 70s they had some interesting things to accommodate for. On the inside wall, they must have originally had a much larger stove. The range hood was much wider than the modern stove that was there when we bought the house. The smaller modern stove left about 18” to the left of the stove that was completely unused. It was actually a pain (literally) because the range hood stuck out into the empty space to the left of the stove and we constantly hit our heads on the sharp corner. On the other side of the kitchen, they had put in a bizarre trapezoid countertop that was dropped 4-5” lower than the rest of the counters.
For the new kitchen, we opted to keep all of the original lower cabinets because they’re solid wood and in great shape. To add counter space and a dishwasher, we removed the radiator that was hiding under the trapezoid counter, and moved a stand-alone lower cabinet that was next to the refrigerator into that space, adding at least four feet of useable work space. We replaced the freestanding stove with a slide-in range, and built a small cabinet to fit on the left side of the stove, adding about 10” of counter space on that side and allowing for the waterfall edge. We removed all of the upper cabinets and put in open shelving with a narrower footprint. This really opened up the space visually, and allows more headroom when working. We put a floor to ceiling pantry cabinet from IKEA next to the fridge to replace the cabinet that had been there and to give us tons of sleek storage space for food, pots and pans.

It seems like your goal was to make your country home look modern but preserve the traditional integrity of the house.
True. We love that our house is old, but we both have a very modern aesthetic. We love clean lines and minimal spaces. We don’t want to completely rebuild and cover up the history of our house, so we try to leave in a lot of the original details and fill the space with a mix of old and new. We have a lot of antique pieces next to hyper-modern Eames and IKEA items. We try to leave all of the original trim intact and re-use anything that still works with our final product.
Black is definitely my favorite color; white is a close second. We both really like a clean, minimal, bright space. I have about a million houseplants, so green is a part of every room as well. Like I touched on previously, we try to mix the hyper-modern, clean white lines with some antique and “natural” touches.

What drew you to this stone in particular?
Wilson’s parents have soapstone in their kitchen, and one of those big soapstone wood stoves as well. It has such a wonderful substantial feel and obviously I love the color.
For the kitchen, we looked at a lot of what we considered to be budget-friendly countertop choices and they all had major pitfalls that we hated. At some point, we went to a countertop company to have them estimate what it would cost to install soapstone in our kitchen. Our kitchen is pretty small, so we had high hopes. Unfortunately the quote we got was about 80 percent of our entire budget.
So when you learned professionally installed soapstone counters were out of your budget what did you do?
We were dismayed but not defeated, and spent some time looking around the internet and reading everything we could about soapstone. We knew about the Alberene [quarry] and had looked into soapstone for some smaller projects around the house. Originally we contacted them about getting stair treads to replace our damaged and cracked wood treads.
We had heard that you could get scraps from Alberene at a pretty good price, and then found that they had “DIY kits”, it was like Christmas morning. Soapstone? That we could afford?? SIGN US UP.

What was the DIY process like from discovering, to picking up slabs to installing?
We are extremely lucky that the quarry is literally down the road from us. We dropped by and talked to someone at Alberene to confirm that they did, in fact, sell kits of countertop slabs and backsplashes, and took a look at the samples. We finished putting together a prospective budget, measured everything to figure out what we would need, and called them back to put in an order. The first batch was a standard DIY kit plus one extra 25.5”x48” slab. They delivered it to us since we’re right down the road and helped us unload it onto a pallet next to our garage.
From there, we measured and cut, measured, and cut, and cut, and sanded, and measured and cut and sanded infinitely. It was not a particularly fast process and it is VERY dusty. Also this was in the winter so it was cold. Also we really only worked on the weekends so it took several months.
We ended up going back to the quarry for two more slabs that we loaded into our little Impreza hatchback to take home. These were for the waterfall edges, and it worked out perfectly because whatever area of the mine they happened to be in at that point had these great quartzite veins that I’m so thrilled with.

What was the installation like?
Installing them would have been easier if any of the walls in our house were actually square. We definitely had to do some creative cutting and sanding to make everything appear plumb and square and even.
The soapstone is very heavy. We’re both fit…ish and the slabs were on the very upper end of manageable for the two of us to get up on sawhorses and carry inside together. Unfortunately you can’t get into our house without going up at least 4 steps, so it was definitely a challenge and Motrin became a good friend of ours.

How much material did you use?
We used the stone for the countertops (25.5” d), waterfall edges (25.5” w x 3’ h), window sills (39” w x 3.75” d and 36” w x 2” d), 4” backsplash all the way around, except behind the sink where it’s up to the window sill (36” w x 7” h) and behind the stove (30” w x 29.5” h).
-
Countertops: 37.67 sq. ft.
-
Backsplashes and windowsills: 15.08 sq. ft.
-
Waterfalls: 12.75 sq. ft.
TOTAL: 65.5 sq. ft.

What oil or wax did you use?
I used mineral oil initially. It made the counters look good (and very very black), but I didn’t love the process. It’s hard to spread and takes a while to seep into the stone. When we went back to Alberene to pick up the last two slabs, they gave me a sample tin of their own blend of wax. It’s beeswax with a little bit of olive oil in it and it goes on beautifully. It’s allows more depth in the color of the stone to come through and you don’t have to wait for it to soak in after you put it on. It also lasts a lot longer than the oil. win/win/win.

How much did the stone cost?
The first kit with all the 4 inch backsplashes plus an extra slab was $1,522. We purchased the two slabs for the waterfall edges for $400.
How do you cut the slabs?
We read that it could be cut with normal woodworking tools and we were so excited and so ready.
We had the best luck cutting the stone with a circular saw. For the sink cut out, we used a hole saw on a drill for the corners, then did a plunge cut with the circular saw. First we tried a jig saw, but the blade was too flexible and it was bending. The sink cut out was definitely the most difficult part.
How did you adhere it to your cabinetry?
We used construction adhesive to adhere it to the cabinets and epoxy to adhere the slabs to each other.
The waterfall with the vein is gorgeous. Did you specifically choose that slab for that place?
I didn’t, actually, but I would have! I love it so much. We actually bought the slabs for the waterfall several months after buying everything else so it was a happy accident that they have such a cool vein. We did spend some time thinking about how best to cut and arrange them, though, and we’re really happy with it.

What would you tell someone considering a DIY kit?
 I think it’s a fantastic way to get soapstone for a great price if you’re willing to put in some blood, sweat and tears. We had all the tools necessary to work with it, but even if you had to buy a drill and a circular saw, you’d still be saving in the long run.
The weight of the stone is definitely a factor. It takes at least two reasonably strong adults to lift the slabs, and maneuvering them onto cabinets is a pain. It’s not easy, but it’s doable.
Cutting the stone is hellaciously messy. (See photo of Wilson at right.) This stuff is really dusty and I can’t imagine cutting it anywhere other than outside with a respirator and eye protection.
Keep in mind that there will probably be more seams with DIY than with a professional installer, but if you plan carefully and do a good job with the seams, they really aren’t very noticeable.
Have you done this before? Will you do it again?
The kitchen is almost certainly the biggest project we’ve ever tackled. It was definitely the most expensive, but we’ve done lots of smaller projects around the house and I have a Google doc with about 42 future projects to knock out one at a time.
Wilson and I have had conversations about whether we would hire contractors to complete projects if we had an unlimited budget and honestly, we probably wouldn’t. We really enjoy the process, and we like having complete control and the ability to make adjustments as we go. We like learning new skills and getting into the guts of our house to make it exactly what we want. Honestly, I’m also a touch on the controlling side and it would be hard for me to let someone else do the work. I would be a contractor’s nightmare because I’m very picky about my “vision” and I can see mistakes and inconsistencies from a mile away.
I don’t think I’ll ever truly feel like the house is finished, nor do I want it to be. It’s great to always have something to do and to constantly be making the home more “ours”.
The Kitchen in a Box kits contain 1 1/4” thick material that covers 24 linear feet of countertop (51 sq. ft.) with six countertop pieces, each 25 1/2″ x 48″ weighing 175 lb and backsplash pieces, each 4″ x 48″. The kits are also available online to ship direct to homes.
For more information on DIY soapstone counters and other products check out the Alberene Soapstone Store.